Introduction

Dateline: 24 February 2019
By: Herrick Kimball

Please Note: This web site is a redux of my 2007 How-To-Butcher-A-Chicken web site, which had over 2 million page views! You will not find a more precise and thorough discussion of the chicken butchering process than is provided here.
=== 

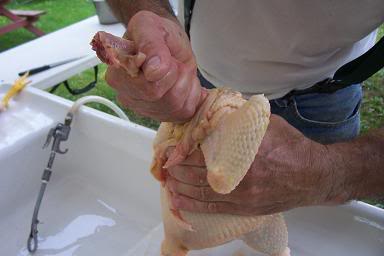
If you want to learn how to butcher a chicken, you’ve come to the right place. This tutorial provides you with a logical, step-by-step explanation of the process, and you will find plenty of great photos to go with the text . 

The pictures here were taken by my 13-year-old son, James Kimball, as we backyard-butchered our 2007 crop of home-raised Cornish-X meat birds. Our family has raised and processed 50 to 75 chickens each year for the past ten years.

James learned at a young age how to process a fatted chicken. When he was eleven, he was killing, scalding, plucking, and gutting chickens, and doing a right good job of it! If an 11-year-old boy can do that, you can too. I have written a photo essay about James processing chickens, Here’s the link: Backyard Poultry Processing With My 11-Year-Old Son.

Unlike James, I did not grow up learning to butcher poultry. I was a sissified suburban kid. It was not until I was 41 years old that I had my first chicken butchering experience, and it was stressful for me. I was, to be perfectly honest, grossed out by the whole thing.

That is the typical modern reaction. Most people these days have become so removed from the reality of food production. As a result, we are practically helpless at providing our own food. We depend on the Industrial Providers to supply us with chicken, and just about everything else we eat. In recent years I’ve come to realize that it is not necessarily a good thing to be so dependent, especially as food production has become so global. I want to become more food in dependent. When you grow your own food, it’s safer. It’s better for you. And it sure is a whole lot more satisfying.

Unpleasant as butchering was, my desire to produce safe, wholesome, home-raised meat for my family was the incentive for me to stick with it. I was determined to not only learn how to process a chicken, but to become good at it.

After 10 seasons of backyard poultry processing, I’ve gotten pretty good at it. And I’ve gotten faster at it too! It took me more than 40 minutes to dress my first chicken (and the finished product was truly slaughtered—in the worst sense of the word). Now, it typically takes me 5 to 7 minutes to gut and clean a chicken (and the finished bird looks pretty nice, if I don’t say so myself). I could go faster, but that is a comfortable pace for me.

This blog will walk you through the whole process of dressing a chicken, one step at a time. Links to each step of the process are in the sidebar over on the right side of this page.

I suggest you copy this guide and have it with you when you butcher your first chickens. Or, if you have a laptop computer, bring it outside and use it as a reference. Isn’t the internet great!

We will begin with a freshly-plucked bird. To learn about things like killing, bleeding, scalding and plucking your chickens, I encourage you to check out the many FREE poultry-related internet photo essays I’ve written (Click Here).

It is my hope that you will be encouraged and empowered by the information presented here; that you will raise your own wholesome chickens for meat, process them yourself, and discover the satisfaction that comes with achieving greater food self sufficiency.

If you like this blog tutorial, I ask that you please let others know about it by posting links at your web sites, blogs, and other internet venues. And I thank you for that.

Herrick Kimball
Moravia, NY
Herrick@PlanetWhizbang.com


Step 1
Getting Ready To Butcher

When my family butchers our chickens, I set up a work area on the back lawn under a tent. An old, enameled, cast iron sink placed over two saw horses serves as my base of operations… 


That sink was outside my dad’s barn for many years before it occurred to me one day that I could put it to good use. It takes two men and a boy to move the thing. When not being used to butcher chickens, I store the sink outside behind my workshop. The enameled surface cleans up nicely with some bleach solution and a scrub pad. 

I removed the original spout and replaced it with a homemade version made from soldered 3/4” copper pipe and fittings. A brass garden hose sprayer on the end does an excellent job. The sprayer can be easily adjusted with a twist to spray lightly or blast a focused stream of water, and that is a nice option to have. Here is a close-up view of the hose sprayer: 


The homemade spout threads into a plastic bulkhead fitting (available from most any agricultural supply store) which fits just right into the sink hole where the old spout was. Water to the sprayer spout comes into the bottom of the bulkhead fitting, back behind the sink as shown here: 


As you can see in the above picture, the old faucet handles are disconnected. How then, you might wonder, does water to the faucet spout get turned on and off? Well, it could be easily turned on and off by twisting the sprayer, but I decided to use another homemade contraption… 


That, my chicken butchering friend, is a foot-operated water valve. It is mounted to an old kitchen cabinet door that rests on the ground under the front of the sink. 


===
2017 Update: Click Here to see a short YouTube movie that explains how that crazy-looking foot-operated water valve works. Also, please Click Here to see a movie showing my current outdoor sink, with a much improved toe tapper faucet switch.
===

By the way, the picture also shows some white PVC drain pipe. The pipe is simply wedged up under the sink drain. The waste water flows down, makes a 90-degree turn, and flows out the end of a 10-foot length of pipe. I pile some straw at the drain’s exit to catch little pieces of chicken guts that get down the pipe. The water just flows out onto the lawn and soaks into the ground. If I let the water drain directly on the ground under the sink, it would create a wet, muddy mess right where I’m standing. Here’s another shot of the valve mechanism: 


In the above picture you can see that I’ve utilized some garden hose Y-fittings to direct water to different places. The garden hose seen in the bottom right is the supply line, bringing water from my house. The garden hose visible on the bottom left leads over to my Whizbang Chicken Plucker. Another line supplies the foot valve contraption. The hose heading up to the top of the photo goes to a PowerFlush Lung Remover that I made. 


That lung remover consists of a basic air blower with the water line going into one end (where the air line would normally connect) and a length of 1/8” pipe screwed into the other end (where the air would normally come out). At the end of the pipe is a stainless steel loop (fashioned from a section of hose clamp) with sharp, pointed notches cut into it. 

To use the lung remover, it is inserted into the body cavity of your chicken after the guts have been pulled out, and the trigger is squeezed. Water blasts out the end, as shown in this picture: 


The combination of blasting/flushing water, and physically scraping with the toothed loop, helps to remove the recalcitrant lungs. 

You needn’t make a PowerFlush Lung Remover like mine. You can buy one Like This for around $60. 


===
2017 Update: With practice, I’ve found that I can remove each lung by sliding my finger underneath and lifting it out in one piece. I would never have thought such a thing was possible when I started processing my own chickens, but it is. I no longer use the PowerFlush Lung Remover I made when this tutorial was originally published.
===

In the final analysis, you don’t need a Rube Goldberg foot valve and PowerFlush lung remover (an inexpensive "dry" scraper Like This will work) to process your own birds. But a makeshift outdoor sink with an operational faucet sure does come in handy. 

The most essential tool for butchering a chicken is a sharp knife. 


That knife in the bottom of the picture is a boning knife made by Chicago Cutlery. It has a 5” blade. I have tried other knives for butchering, but none come close to that boning knife for comfort and functional usefulness. It is my workhorse knife and I've become quite fond of it. 

The blade steel in the Chicago Cutlery knife is a combination of carbon and stainless steel. That means it sharpens better, hones better, and holds an edge better than a blade of pure stainless steel, yet doesn't rust like a blade of pure carbon steel. 

It’s interesting to note that Chicago Cutlery began by making knives for the poultry industry and their boning knife is the most popular blade they sell. You can buy a new one for less than $20 and it should last you the rest of your chicken butchering days. 

The bigger knife you see in the above picture is a nice quality Forschner, made in Switzerland by Victorinox. I got the knife from my sister who once dated a professional chef. He gave her the knife as a Christmas gift. She wasn’t impressed. Shortly after their relationship ended, I got the knife and I’m very pleased with it. I use the large, heavy, 8” blade after butchering, when I cutting chickens into parts for freezing (as I discuss later in this tutorial). I see that Forschner also has a nice selection of poultry knives that I'll bet are a joy to use. 

At the top of the picture is a butcher’s steel. I never used a butcher’s steel until I became a backyard chicken killer. Now I couldn’t butcher without it. The steel will not grind and sharpen a dull blade. It is, instead, used to "tune up" the edge of a sharpened blade that is losing it's sharpness.

After butchering a couple of chickens, I use the steel to quickly refresh the blade on my knife. You can buy an inexpensive butcher’s steel for around $10. 

For sharpening your knife blades, you need a simple, reliable, knife sharpener. Here’s a picture of the sharpener I use: 


Chuck the sharpener in your drill, turn it on, and stroke your knife blade between the stones. It doesn’t get much easier than that. Sharpening is fast with this little device. And, unlike so many other sharpening systems, this one is relatively cheap. The sharpener is made by Vermont American. 

===
Update 2017: Unfortunately, it looks like the Vermont American company no longer makes that simple little blade sharpener. I still use the one in the picture, but there are all kinds of other sharpening devices out there.
===

I’ll take a moment to re-sharpen my blade after every 50 birds. Then I’ll use the butcher’s steel to keep it sharp. Cutting chickens with a sharp blade is such a pleasure. 

Here’s one last item you’ll need… 


That’s my son James filling a big cooler with cold water from our well. After you butcher your birds, you want to cool them down and store them somewhere where flies can’t get to them. The big cooler full of cold water will do the job. We also add ice to the water. That cooler will hold around 20 chickens (average weight, 4.5 pounds). You needn’t use a storebought cooler for this purpose. Any kind of big, clean, plastic or metal container will do the job too. 

So, in review, you need to set yourself up with some sort of backyard butchering station (preferably with a sink and running water), obtain a good, sharp knife, and have a big container of ice water to toss your butchered birds into. 

Oh, there are a couple other things you’ll need. Make sure you have one or more kitchen pots (with lids) on hand. They will be needed to put chicken necks and edible internal organs (liver, heart, & gizzard) into. And you’ll need some sort gut bucket for the other internal parts that you will be disposing of. 

NOW you’re ready to deal with those birds... 


=== 


Step 2
Remove The Feet

With your dead, bled, scalded, and freshly plucked chicken in hand, I suggest the first thing you do is give it a good rinsing off, as shown in the following two pictures. This is where the makeshift sink with running water (discussed in Step 1) comes in real handy. 


As I am rinsing, I’m examining the carcass and rubbing, pulling, or scraping off any remaining pin feathers. If you had a proper scald and used a mechanical chicken plucker (i.e., a homemade Whizbang Plucker) you won’t have much in the way of pinfeathers to remove, especially with the Cornish-X meat birds. 

I begin butchering a chicken by removing its feet. 

Lay the bird on its back. Grasp a foot and apply downward tension while slicing into the joint, as shown in this picture. 


There is no need to cut here with a lot of force. You want to direct your knife blade between the joint and through the tendons. Just saw gently ahead and back with the sharp knife while bending back on the foot. You will find this is an easy thing to do. Here are a couple more pictures. 


If your children are interested in seeing how the exposed tendons in the feet work, get a pair of pliers, grip on the exposed tendon ends in the foot, and give a pull. The toes will move. Very cool. Butchering chickens is educational, don’t you know? You can see the white tendon tips in this picture: 


I throw the feet away. But you can actually put them to good use. Save them for making chicken feet soup. Or, I understand that in South Africa, enterprising street vendors sell fried chicken feet on a stick, and it is a very popular treat. You first. 


===


Step 3
Remove The Head

With the feet removed, I turn my attention to the opposite end of the bird. The head must now be removed.

Joel Salatin, author of the book, Pasture Poultry Profits, removes chicken heads by pulling them off. I’ve done that. My kids have done that. Even my wife, The Lovely Marlene, has pulled a chicken’s head off its body. I recommend that you give it a try too. But it’s okay to use a knife, and it's a whole lot easier.


Slice into the neck just under the head. There are bones in the neck and you will meet with some resistance, but it is not too much for a sharp knife. 


Most of the time, I just cut into the meaty section of the neck, That weakens the connection. Then I’ll pull it off.


Besides disconnecting the head from the neck, there are a couple of tubes going into the head that you need to sever. In the picture above, I am cutting through the esophagus (which is where the food goes down) and trachea (which takes air to the lungs)to finish the job.

As far as I know, there are no culinary uses for a chicken’s head. It goes in the gut bucket.

However, like the feet, chicken heads do have some educational and entertainment value. When they were younger, my boys had a lot of fun with chicken heads. Then we threw them in the bucket.


===


Step 4
Loosen The Crop

When a chicken eats corn, or grass, or bugs, or whatever, the food does not go into a stomach like mammals have. It is swallowed down into a crop. A chicken’s crop is located at the base of the neck, against the breast, just to the bird’s right of center. If the crop has much feed in it, you can actually see it bulging, as is the case in this next picture:


To better understand the flow of food, and parts involved, I present to you this delightful picture:


Obviously, that’s the bird’s head at the top of the picture. The soft, fleshy tube leading down to the middle object is the esophagus. That middle object is the crop. 

The crop is a soft, fleshy sac that will expand considerably to accommodate all that the bird eats. The crop in the picture is quite full. 

From the crop, the food makes its way down inside the body cavity to the bird’s gizzard, which is the large, roundish organ shown in the bottom of the picture.

But before it goes into the gizzard, the food passes through an organ attached to the gizzard called the proventriculus, which is clearly visible in the picture. The proventriculus introduces digestive juices to the food before it enters the gizzard.

The gizzard is a red-meat muscle. It looks like beef when you cut into it. The gizzard has a tough inner lining. The grinding and digesting action inside the gizzard is facilitated by grit, which amounts to small stones that the chicken eats. Cut the gizzard open and you will find grit and food. 

Most people don’t feed their chickens for 24 hours prior to butchering. That ensures that the crop will be empty come processing day. But some people like the bird to have a little food in its crop so they can find it better. Whatever the case, I’m going to explain a couple of different options for dealing with the crop. If it’s really full, I suggest you remove it. If it is empty or almost empty, you need only to loosen it. 

In either event, you must first remove some skin from the bird’s neck in order to get to the crop. The way I do this is to lay the chicken on its back with its neck stretched out. Then I cut into the skin about half way up the neck, and slice a strip of skin off up to the end of the neck.


The above picture shows approximately where I slice into the neck skin. I do not just cut down as the photo suggests. What I do is use my fingertips to pinch the skin on the neck and lift it up a bit. Then I slice into the skin just below where I have lifted it. 

Still holding on to the pinched piece of neck skin with my fingers, I then fillet a section of skin up the neck as shown in this next picture. 


Notice my fingertips pinched onto the skin in the upper right of the picture. By lifting the skin as I cut, I am keeping tension where the cutting is taking place. If I did not do this, the skin will not cut very well, no matter how sharp the knife is. Chicken skin, especially on the neck, is loose and rubbery. Here’s another shot showing how I fillet just a narrow strip of skin up the underside of the neck. 


Directly underneath the neck skin in the above picture is the esophagus and trachea. This next picture shows both neck tubes much better.


In the above picture, I have pulled the esophagus and trachea free of the bird’s neck. The tube on the right, which is also the bird’s right side (it is on its back) is the esophagus which leads into the crop. The other tube is the trachea. You can easily tell the difference between the two tubes. The trachea is ribbed and far more rigid than the soft esophagus. The trachea leads down into the body cavity where it connects with the lungs.

You can also see in the picture that my other hand is grasping the neck skin. I will pull it down and away from the neck. 

Now we need to find and uncover the crop. If the crop has much food in it, you will find it just fine, as shown in this next picture.


The photo shows the esophagus extending from the crop to around my index finger. The tip of my ring finger is under the crop. To the side of my little finger is the neck. My hand above is grasping neck skin and pulling it away from the crop.

The crop will be tight to the bird’s neck skin and breast. It needs to be worked free. The crop is very durable, but use a careful touch so you don’t break it. If you do break the crop, you will have a bit of a mess. But it isn’t a major crisis. It’s just undigested feed. Rinse everything off real good.

If the crop is quite full, I remove it from the bird as shown here…..


What you are looking at in the picture is my upper hand grasping the full crop (the bird’s neck is out of sight behind my hand). And with my lower hand I am giving the carcass a couple twists. Then, crop in hand, I pull slow and steady, directly out of the body cavity. 

If all goes well, the tube from the crop to the gizzard will disengage very nicely where the gizzard and proventriculus connect, as seen in the photo below (that is the proventriculus in my lower hand). If it doesn’t pop off as neatly as shown here, no problem. Either way, the full crop has been removed. Toss it out.


When you are dealing with an empty crop, or one with very little food in it, there is no need to completely remove it. But you must still peel it away from the skin and upper breast of the animal. This needs to be done because, later, when you reach your hand in the back end of the bird to remove it’s innards, your fingers will grasp the big gizzard. As you extract the gizzard, the separated crop will pull down through the neck cavity, into the body cavity, and right on out. 

I think that finding and separating an empty crop is the most difficult part of butchering a bird. It holds tight to the skin and the color blends in too. The best way I know to get the crop free it to grasp the bird’s skin with one hand while pinching, pulling, and peeling the crop away. Here are a couple photos showing me pulling the fleshy crop away. In both pictures, the crop is being grasped by my hand on the left side of the photograph.Separating the crop is one of those things that you'll get the hang of with experience.


===


Step 5
Remove The Neck

Removing the chicken’s neck is relatively easy. Begin by grasping the neck with one hand and use your other hand to pull the skin around the neck down, as shown in this picture:


What you are doing is getting access to the base of the neck, where you will make a cut. Here’s another picture:


With the skin pulled down, and the base of the neck where it joins the back of the bird exposed, use your knife to slice into the meat of the neck. The cut is almost between the bird’s shoulder blades. The cutting objective is NOT to cut through the neck. Instead, you want to simply push the sharp blade into the meaty neck until you meet the resistance of bone. Here’s a picture:


That done, make a similar pushing-cut into one side of the neck, then the other. 


It takes only a moment to make these three neck cuts, and they serve to significantly weaken the neck’s connection to the body. Now comes the fun part. Pick the bird up by the neck with one hand and twist the body around with your other hand. A couple turns and the neck will come right off.


We save the necks and use them to make broth, which I explain how to do later in this tutorial. Put them in a stock pot with cold water in it and a lid on the top.


There will be a lot of neck skin remaining on the bird. Leave it all there if you want. Or you can trim it down a bit as shown here….


I would like to draw your attention to a couple of things in the above picture. First, you will notice my homemade Whizbang Garden Cart in the background. If you don’t have a Whizbang Garden Cart, you need to get one. It is, without a doubt, the single most useful tool on my homestead. 

The other thing I’d like to mention is that you can see two gizzards on the sink to the right in the picture. I put those there because I was going to use them for a photo (that is coming up). They were not used for human consumption. If they were, I would never have put them there and left them. I would have put them in a pot of cold water with a lid.

Just because it's backyard processing doesn’t mean it has to be unsanitary. On the contrary, backyard processing can be very sanitary. I dare say it can be far more safe and sanitary than an industrial processing facility! Keep your birds clean (this is where the sink with running water comes in handy), process properly (as I’m telling you in this blog), cool the meat down in cold water immediately after butchering, and don’t leave any meat that you are going to eat out where flies can get to it. End of sermon.


===


Step 6
Remove The Oil Gland

The chicken’s tail has an oil gland on it that almost all people remove during the butchering process. I say almost all because I’ve heard of some who leave the oil gland on. To each his own. I cut it off. Here is a picture of the gland in question:


Removing the gland is easy enough. Simply position your knife above the gland, as shown in the above photo and slice down. It helps to hold on to it while cutting. You will see the gland itself as you are cutting. It stands out as a deep, yellow color. If one slice does not get it all, make another cut as needed to remove all the yellow.


And there you have it….


Here is another view of the gland being cut off. 


===


Step 7
Open Up The Back End

Now we come to the really exciting part of butchering a chicken, or at least the start of it. Before you can reach into the chicken’s body cavity and pull out its insides, you need to cut an opening at the back end.

My approach to this is to cut a small opening with the knife, then reach into the opening and tear it wider. The less cutting you do, the less chance there is that you’ll cut into an intestine or some other internal organ that you shouldn’t cut into.

So here we are at the posterior of the bird, with the knife in position to make a slice:


Directly below my knife in the picture is the cloaca of the bird. The cloaca is also sometimes called the "vent." Frankly speaking, it is the bird's butt hole. That is as frank as I will get.

Notice that I am pinching and lifting the skin above the knife. And notice also that my knife blade is angled up a bit. That’s what you want to do: lift the skin and slice up into the lifted part. By doing it that way, you avoid cutting into any internal organs. Here’s another view of the cutting position:


Now, in this next picture you can see that I have made a horizontal slice. I have cut through the skin and underlying yellow fat just enough to make a small opening into the body cavity.

Please Note: When you cut into the bird’s body cavity, no liquid should come out. If liquid (i.e. yellow-colored water) does come pouring out of the opening, the bird is sick. Throw it away. I have had this happen on two birds in ten years.


Here is another photo angle, showing just how much of an opening cut I make...


That’s all you need. Then you work your finger tips into the opening and enlarge it enough to get a grip on the top and bottom of the cut, as shown here:


See how I have two fingers on one hand and two fingers on the other hand in the body cavity and I am pulling the opening to make it larger? That’s what you do.

Here is where I need to warn you of something important. If the chicken has had access to food prior to butchering, there will be fecal matter (a.k.a, FEMAT) in its intestine. That being the case, when you tear the opening larger, you are going to put pressure on the intestine, and FEMAT will be forced out the vent. 

FEMAT escape is disgusting but it is to be expected: FEMAT happens. When it does, stop what you are doing, position the bird’s back end under the faucet and thoroughly flush all FEMAT away, being very careful not to let it enter the body cavity. If you get FEMAT on your work surface, flush it away with lots of fresh water and a rinse of diluted bleach solution. Problem solved.

Here’s a picture of the body cavity opened up sufficiently:


Here’s another picture of the opened up chicken. My right hand is poised to plunge in. That’s the next step……


===