When my family butchers our chickens, I set up a work area on the back lawn under a tent. An old, enameled, cast iron sink placed over two saw horses serves as my base of operations…

That sink was outside my dad’s barn for many years before it occurred to me one day that I could put it to good use. It takes two men and a boy to move the thing. When not being used to butcher chickens, I store the sink outside behind my workshop. The enameled surface cleans up nicely with some bleach solution and a scrub pad.
I removed the original spout and replaced it with a homemade version made from soldered 3/4” copper pipe and fittings. A brass garden hose sprayer on the end does an excellent job. The sprayer can be easily adjusted with a twist to spray lightly or blast a focused stream of water, and that is a nice option to have. Here is a close-up view of the hose sprayer:

The homemade spout threads into a plastic bulkhead fitting (available from most any agricultural supply store) which fits just right into the sink hole where the old spout was. Water to the sprayer spout comes into the bottom of the bulkhead fitting, back behind the sink as shown here:

As you can see in the above picture, the old faucet handles are disconnected. How then, you might wonder, does water to the faucet spout get turned on and off? Well, it could be easily turned on and off by twisting the sprayer, but I decided to use another homemade contraption…
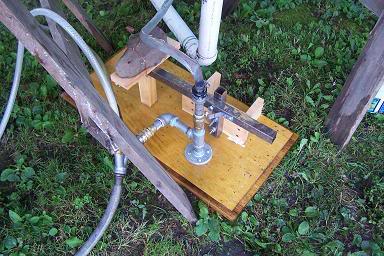
That, my chicken butchering friend, is a foot-operated water valve. It is mounted to an old kitchen cabinet door that rests on the ground under the front of the sink.
By the way, the picture also shows some white PVC drain pipe. The pipe is simply wedged up under the sink drain. The waste water flows down, makes a 90-degree turn, and flows out the end of a 10-foot length of pipe. I pile some straw at the drain’s exit to catch little pieces of chicken guts that get down the pipe. The water just flows out onto the lawn and soaks into the ground. If I let the water drain directly on the ground under the sink, it would create a wet, muddy mess right where I’m standing. Here’s another shot of the valve mechanism:

In the above picture you can see that I’ve utilized some garden hose Y-fittings to direct water to different places. The garden hose seen in the bottom right is the supply line, bringing water from my house. The garden hose visible on the bottom left leads over to my Whizbang Chicken Plucker. Another line supplies the foot valve contraption. The hose heading up to the top of the photo goes to a PowerFlush Lung Remover that I made.

That lung remover consists of a basic air blower with the water line going into one end (where the air line would normally connect) and a length of 1/8” pipe screwed into the other end (where the air would normally come out). At the end of the pipe is a stainless steel loop (fashioned from a section of hose clamp) with sharp, pointed notches cut into it.
To use the lung remover, it is inserted into the body cavity of your chicken after the guts have been pulled out, and the trigger is squeezed. Water blasts out the end, as shown in this picture:

The combination of blasting/flushing water, and physically scraping with the toothed loop, helps to remove the recalcitrant lungs.
You needn’t make a PowerFlush Lung Remover like mine. You can buy one Like This for around $60.
In the final analysis, you don’t need a Rube Goldberg foot valve and PowerFlush lung remover (an inexpensive "dry" scraper Like This will work) to process your own birds. But a makeshift outdoor sink with an operational faucet sure does come in handy.
The most essential tool for butchering a chicken is a sharp knife.

That knife in the bottom of the picture is a boning knife made by Chicago Cutlery. It has a 5” blade. I have tried other knives for butchering, but none come close to that boning knife for comfort and functional usefulness. It is my workhorse knife and I've become quite fond of it.
The blade steel in the Chicago Cutlery knife is a combination of carbon and stainless steel. That means it sharpens better, hones better, and holds an edge better than a blade of pure stainless steel, yet doesn't rust like a blade of pure carbon steel.
It’s interesting to note that Chicago Cutlery began by making knives for the poultry industry and their boning knife is the most popular blade they sell. You can buy a new one for less than $20 and it should last you the rest of your chicken butchering days.
The bigger knife you see in the above picture is a nice quality Forschner, made in Switzerland by Victorinox. I got the knife from my sister who once dated a professional chef. He gave her the knife as a Christmas gift. She wasn’t impressed. Shortly after their relationship ended, I got the knife and I’m very pleased with it. I use the large, heavy, 8” blade after butchering, when I cutting chickens into parts for freezing (as I discuss later in this tutorial). I see that Forschner also has a nice selection of poultry knives that I'll bet are a joy to use.
At the top of the picture is a butcher’s steel. I never used a butcher’s steel until I became a backyard chicken killer. Now I couldn’t butcher without it. The steel will not grind and sharpen a dull blade. It is, instead, used to "tune up" the edge of a sharpened blade that is losing it's sharpness.
After butchering a couple of chickens, I use the steel to quickly refresh the blade on my knife. You can buy an inexpensive butcher’s steel for around $10.
For sharpening your knife blades, you need a simple, reliable, knife sharpener. Here’s a picture of the sharpener I use:

Chuck the sharpener in your drill, turn it on, and stroke your knife blade between the stones. It doesn’t get much easier than that. Sharpening is fast with this little device. And, unlike so many other sharpening systems, this one is relatively cheap. The sharpener is made by Vermont American.
===
Update 2017: Unfortunately, it looks like the Vermont American company no longer makes that simple little blade sharpener. I still use the one in the picture, but there are all kinds of other sharpening devices out there.
===
I’ll take a moment to re-sharpen my blade after every 50 birds. Then I’ll use the butcher’s steel to keep it sharp. Cutting chickens with a sharp blade is such a pleasure.
Here’s one last item you’ll need…

That’s my son James filling a big cooler with cold water from our well. After you butcher your birds, you want to cool them down and store them somewhere where flies can’t get to them. The big cooler full of cold water will do the job. We also add ice to the water. That cooler will hold around 20 chickens (average weight, 4.5 pounds). You needn’t use a storebought cooler for this purpose. Any kind of big, clean, plastic or metal container will do the job too.
So, in review, you need to set yourself up with some sort of backyard butchering station (preferably with a sink and running water), obtain a good, sharp knife, and have a big container of ice water to toss your butchered birds into.
Oh, there are a couple other things you’ll need. Make sure you have one or more kitchen pots (with lids) on hand. They will be needed to put chicken necks and edible internal organs (liver, heart, & gizzard) into. And you’ll need some sort gut bucket for the other internal parts that you will be disposing of.
NOW you’re ready to deal with those birds...

That sink was outside my dad’s barn for many years before it occurred to me one day that I could put it to good use. It takes two men and a boy to move the thing. When not being used to butcher chickens, I store the sink outside behind my workshop. The enameled surface cleans up nicely with some bleach solution and a scrub pad.
I removed the original spout and replaced it with a homemade version made from soldered 3/4” copper pipe and fittings. A brass garden hose sprayer on the end does an excellent job. The sprayer can be easily adjusted with a twist to spray lightly or blast a focused stream of water, and that is a nice option to have. Here is a close-up view of the hose sprayer:

The homemade spout threads into a plastic bulkhead fitting (available from most any agricultural supply store) which fits just right into the sink hole where the old spout was. Water to the sprayer spout comes into the bottom of the bulkhead fitting, back behind the sink as shown here:

As you can see in the above picture, the old faucet handles are disconnected. How then, you might wonder, does water to the faucet spout get turned on and off? Well, it could be easily turned on and off by twisting the sprayer, but I decided to use another homemade contraption…

That, my chicken butchering friend, is a foot-operated water valve. It is mounted to an old kitchen cabinet door that rests on the ground under the front of the sink.
===
2017 Update: Click Here to see a short YouTube movie that explains how that crazy-looking foot-operated water valve works. Also, please Click Here to see a movie showing my current outdoor sink, with a much improved toe tapper faucet switch.
===
By the way, the picture also shows some white PVC drain pipe. The pipe is simply wedged up under the sink drain. The waste water flows down, makes a 90-degree turn, and flows out the end of a 10-foot length of pipe. I pile some straw at the drain’s exit to catch little pieces of chicken guts that get down the pipe. The water just flows out onto the lawn and soaks into the ground. If I let the water drain directly on the ground under the sink, it would create a wet, muddy mess right where I’m standing. Here’s another shot of the valve mechanism:

In the above picture you can see that I’ve utilized some garden hose Y-fittings to direct water to different places. The garden hose seen in the bottom right is the supply line, bringing water from my house. The garden hose visible on the bottom left leads over to my Whizbang Chicken Plucker. Another line supplies the foot valve contraption. The hose heading up to the top of the photo goes to a PowerFlush Lung Remover that I made.

That lung remover consists of a basic air blower with the water line going into one end (where the air line would normally connect) and a length of 1/8” pipe screwed into the other end (where the air would normally come out). At the end of the pipe is a stainless steel loop (fashioned from a section of hose clamp) with sharp, pointed notches cut into it.
To use the lung remover, it is inserted into the body cavity of your chicken after the guts have been pulled out, and the trigger is squeezed. Water blasts out the end, as shown in this picture:

The combination of blasting/flushing water, and physically scraping with the toothed loop, helps to remove the recalcitrant lungs.
You needn’t make a PowerFlush Lung Remover like mine. You can buy one Like This for around $60.
===
2017 Update: With practice, I’ve found that I can remove each lung by sliding my finger underneath and lifting it out in one piece. I would never have thought such a thing was possible when I started processing my own chickens, but it is. I no longer use the PowerFlush Lung Remover I made when this tutorial was originally published.
===
In the final analysis, you don’t need a Rube Goldberg foot valve and PowerFlush lung remover (an inexpensive "dry" scraper Like This will work) to process your own birds. But a makeshift outdoor sink with an operational faucet sure does come in handy.
The most essential tool for butchering a chicken is a sharp knife.

That knife in the bottom of the picture is a boning knife made by Chicago Cutlery. It has a 5” blade. I have tried other knives for butchering, but none come close to that boning knife for comfort and functional usefulness. It is my workhorse knife and I've become quite fond of it.
The blade steel in the Chicago Cutlery knife is a combination of carbon and stainless steel. That means it sharpens better, hones better, and holds an edge better than a blade of pure stainless steel, yet doesn't rust like a blade of pure carbon steel.
It’s interesting to note that Chicago Cutlery began by making knives for the poultry industry and their boning knife is the most popular blade they sell. You can buy a new one for less than $20 and it should last you the rest of your chicken butchering days.
The bigger knife you see in the above picture is a nice quality Forschner, made in Switzerland by Victorinox. I got the knife from my sister who once dated a professional chef. He gave her the knife as a Christmas gift. She wasn’t impressed. Shortly after their relationship ended, I got the knife and I’m very pleased with it. I use the large, heavy, 8” blade after butchering, when I cutting chickens into parts for freezing (as I discuss later in this tutorial). I see that Forschner also has a nice selection of poultry knives that I'll bet are a joy to use.
At the top of the picture is a butcher’s steel. I never used a butcher’s steel until I became a backyard chicken killer. Now I couldn’t butcher without it. The steel will not grind and sharpen a dull blade. It is, instead, used to "tune up" the edge of a sharpened blade that is losing it's sharpness.
After butchering a couple of chickens, I use the steel to quickly refresh the blade on my knife. You can buy an inexpensive butcher’s steel for around $10.
For sharpening your knife blades, you need a simple, reliable, knife sharpener. Here’s a picture of the sharpener I use:

Chuck the sharpener in your drill, turn it on, and stroke your knife blade between the stones. It doesn’t get much easier than that. Sharpening is fast with this little device. And, unlike so many other sharpening systems, this one is relatively cheap. The sharpener is made by Vermont American.
===
Update 2017: Unfortunately, it looks like the Vermont American company no longer makes that simple little blade sharpener. I still use the one in the picture, but there are all kinds of other sharpening devices out there.
===
I’ll take a moment to re-sharpen my blade after every 50 birds. Then I’ll use the butcher’s steel to keep it sharp. Cutting chickens with a sharp blade is such a pleasure.
Here’s one last item you’ll need…

That’s my son James filling a big cooler with cold water from our well. After you butcher your birds, you want to cool them down and store them somewhere where flies can’t get to them. The big cooler full of cold water will do the job. We also add ice to the water. That cooler will hold around 20 chickens (average weight, 4.5 pounds). You needn’t use a storebought cooler for this purpose. Any kind of big, clean, plastic or metal container will do the job too.
So, in review, you need to set yourself up with some sort of backyard butchering station (preferably with a sink and running water), obtain a good, sharp knife, and have a big container of ice water to toss your butchered birds into.
Oh, there are a couple other things you’ll need. Make sure you have one or more kitchen pots (with lids) on hand. They will be needed to put chicken necks and edible internal organs (liver, heart, & gizzard) into. And you’ll need some sort gut bucket for the other internal parts that you will be disposing of.
NOW you’re ready to deal with those birds...
===